How to Build a
Trebuchet in the Wild
A siege-scale counterweight machine, raised single-handed, from timber and rope.
Siege · 5 m beam
One, patiently
Two long days
{{ rangeHeadline }}
How the thing works
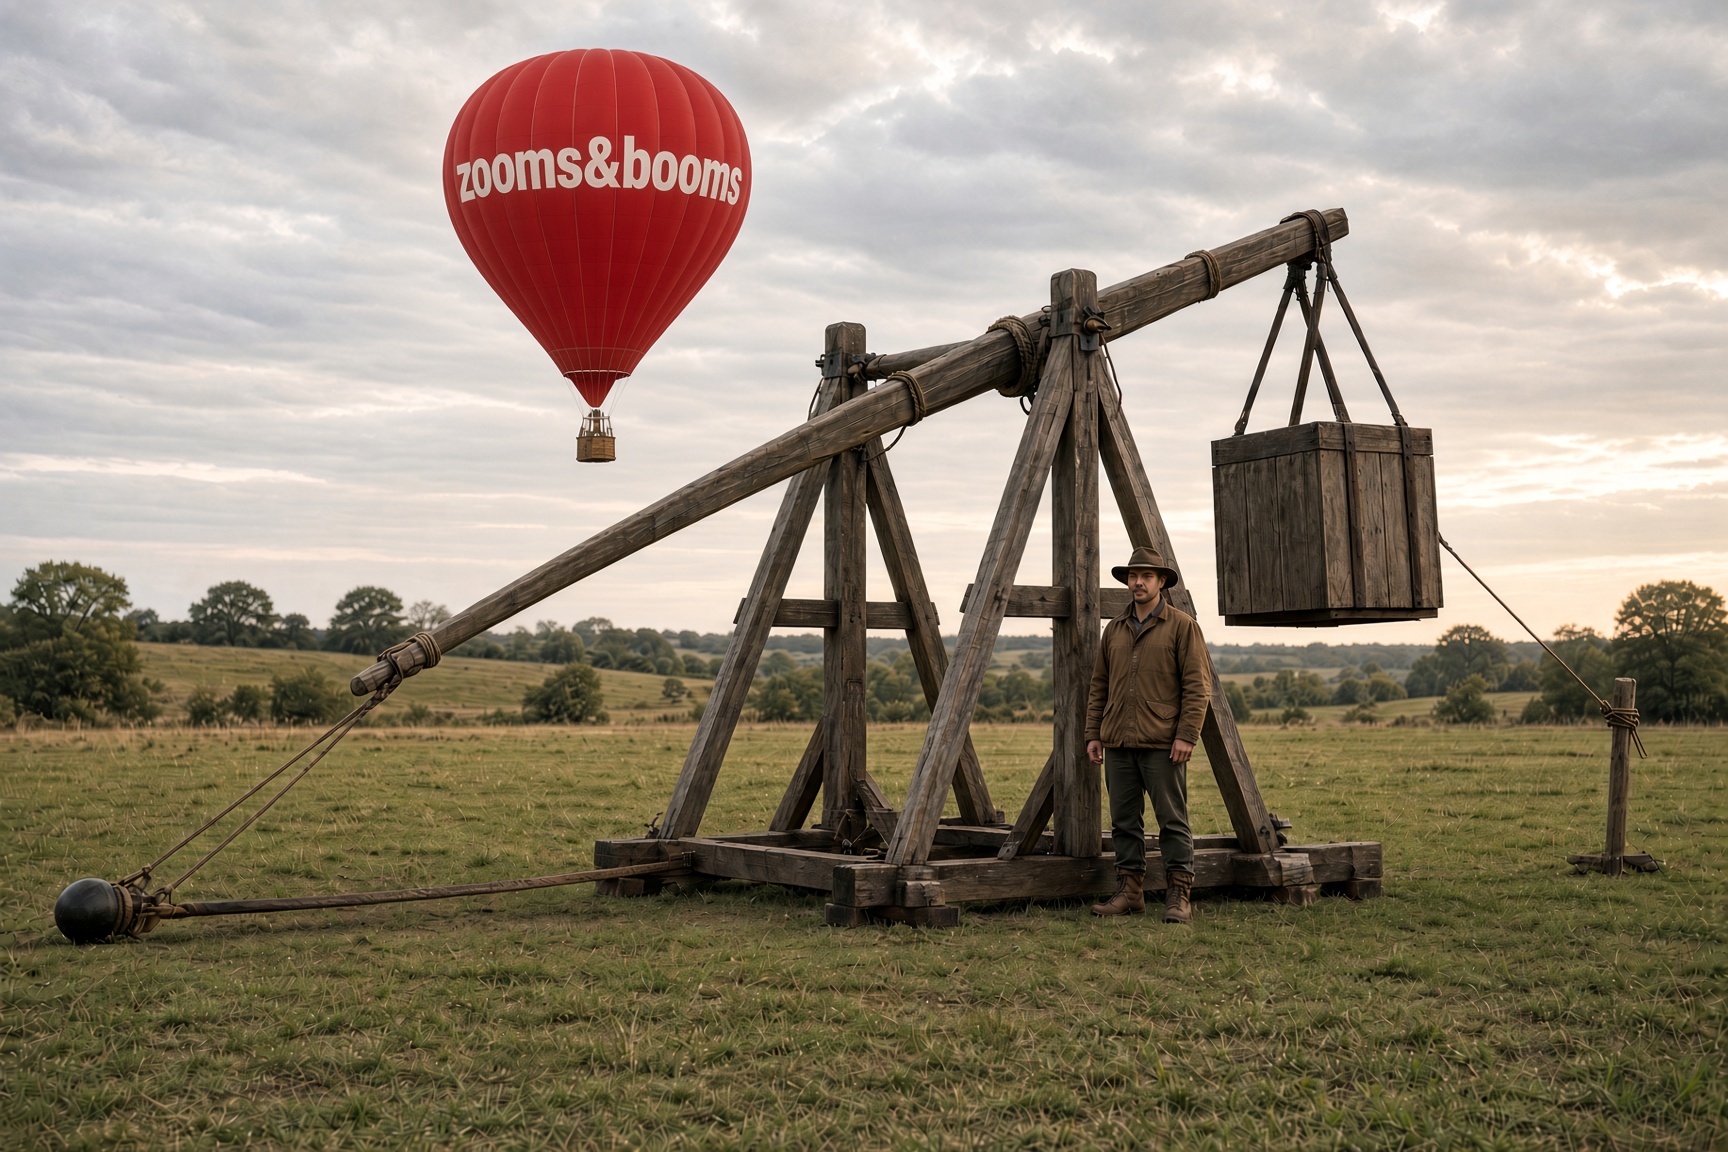
A counterweight trebuchet is a patient machine. You spend a minute lifting a heavy box a short way up, and it spends half a second putting that same energy into something light, moving fast. Nothing is stored in springs or twisted rope — it is all gravity, borrowed and handed on.
Three multiplications happen in sequence. The lever trades the counterweight's short drop for a long, fast sweep of the beam tip. The sling doubles the effective arm again, so the pouch travels faster than the wood ever does. And the release pin chooses the moment: the pouch slips free when the shot is pointed where you want it, near 45° above the horizon.
The number that matters most is the mass ratio. Counterweight to projectile at {{ ratioLabel }} : 1 is the honest working band for a timber machine. Below 60 : 1 the shot lobs sadly; above about 150 : 1 you are no longer testing physics, you are testing your lashings.
Every kilo you add to the box is a kilo that must be lifted by hand, alone, at the end of a long day. Design the machine you can still cock when you are tired.
Choosing your ground
Pick the site before you cut a single pole. A good machine on bad ground is a bad machine. You want firm, level, well-drained footing for the frame, and a long empty field in front of it that you can see all the way down.
Three times your expected range, clear of livestock, roads, paths, windows and water you cannot wade. Assume a wild shot at 30° off the centreline.
Mineral soil or turf, not peat, sand or mud. Slope under 2°. Dig the feet in 15 cm (6 in) and seat them on flat stone pads.
Nothing within 6 m (20 ft) above the axle: no branches, no cables, no guy lines. The beam tip passes higher than you expect.
Keep 4 m (13 ft) clear behind the frame for the counterweight's swing and for the haul line you will pull on to raise it.
Set up to throw across or into the wind, never with a crosswind on the raised beam. Above 30 km/h (20 mph), stand down.
Ask the landowner. Say the words "counterweight trebuchet" out loud, show them this page, and agree where the shots will land.
Mark the throw lane with two stakes and a length of bright cord before the first shot. Once the machine is loaded, that cord is the line nobody crosses — including you.
Materials & sourcing
Standing deadwood is your friend: dry, light, already seasoned. Green poles are stronger in bending but heavy to move alone and they will check as they dry. Spruce, pine, larch, ash and chestnut all serve. Avoid willow and poplar for anything load-bearing, and never use a pole with a spiral crack, a soft heart, or a big knot where the axle will bear.
| Member | Qty | Size | Notes |
|---|---|---|---|
| Frame legs | 4 | 3.4 m × 14 cm 11 ft × 5½ in | Straightest poles you have. Two A-frames. |
| Ground sills | 2 | 4.0 m × 16 cm 13 ft × 6 in | Run fore-and-aft. Heaviest timber on site. |
| Cross braces | 6 | 2.2 m × 9 cm 7 ft × 3½ in | Four diagonals, two horizontals. |
| Throwing beam | 1 | 5.0 m × 13→8 cm 16 ft × 5→3 in | Natural taper, butt end to the counterweight. No knots near the axle hole. |
| Axle | 1 | 1.0 m × 40 mm 3 ft × 1½ in | Steel pipe if you can carry it; otherwise green oak or ash, oversize to 70 mm. |
| Lashing cord | 60 m | 6–8 mm ¼–5⁄16 in | Polyester or manila. Low stretch matters more than breaking strain. |
| Sling & haul rope | 20 m | 10–12 mm ⅜–½ in | Braided, not laid — laid rope spins the pouch. |
| Pouch | 1 | 30 × 45 cm 12 × 18 in | Heavy canvas, leather, or a doubled feed sack. |
| Counterweight box | 1 | {{ boxLabel }} | Filled on site with stone and gravel — see Section 07. |
Carried-in hardware, if you allow yourself any: two 12 mm (½ in) eye bolts for the sling ends, a dozen 150 mm (6 in) spikes, and the axle pipe. Everything else can come out of the wood and the cord.
Tools to carry in
- Felling axe, 900 g head, sharp
- Bow saw or folding pruning saw, 600 mm
- Brace and 40 mm auger bit — for the axle bearings
- Knife with a spine you can strike
- File and a small stone; sharpen at every break
- Tape, 8 m (25 ft)
- Chalk or lumber crayon
- A plumb bob — a stone on a string
- A story pole: one straight stick, marked with every repeated dimension
- 3:1 block and tackle, or a 4 m haul line and a stout stake
- Two pry bars or peeled levers
- Three round rollers for skidding timber
- A gin pole — one spare 3 m leg, guyed
- Gloves and eye protection
- Whistle — one blast means stand clear
- First aid kit, within arm's reach of the machine
- A pencil and this manual
The frame
Two A-frames, standing on two sills, braced against each other. Build both A-frames flat on the ground, side by side, so they come out identical — then raise them one at a time. This is the part of the job where working alone changes the method, not the design.
- 01
Lay the sills
Set the two sills parallel, 1.1 m (3½ ft) apart, running in the direction of the throw. Level them with dug pads and flat stone. Everything above is only as square as this.
- 02
Build the A-frames flat
Cross two legs so they meet 2.6 m (8½ ft) above where the feet will sit, with the feet 1.8 m (6 ft) apart. Shear-lash the crossing, then add one horizontal brace a third of the way up. Repeat for the second frame, using the first as your pattern.
- 03
Bore the bearings
While the frames are still flat, bore the axle hole through the crossing of each — 5 mm oversize, square to the plane of the frame. A hole bored on the ground is a hole bored straight.
- 04
Raise frame one, alone
Peg the feet against cleats spiked to the sills so they cannot skid. Run a haul line from the apex over a guyed gin pole to a stake behind you, and walk the frame up hand over hand. Guy it fore and aft before you let go of the rope. Never lift from beneath it.
- 05
Raise frame two and marry them
Same method, 1.1 m astern. Immediately connect the apexes with a horizontal, then run diagonals from each apex to the opposite foot on both sides. Four diagonals. The frame is not a frame until they are on.
- 06
Test before you trust
Hang your whole body weight from the axle and bounce. Watch for cord creep, foot sink, and any lashing that moves. Re-tension everything, then walk away for ten minutes and check it again cold.
Throwing arm & sling
The beam does two jobs: it survives a violent bending load, and it holds the release pin at the right angle. Dress it with a drawknife or axe so the axle hole sits in solid wood, and bind the beam either side of the hole with tight round lashings — ten turns each side. Wood splits along the grain from a bored hole; cord stops it.
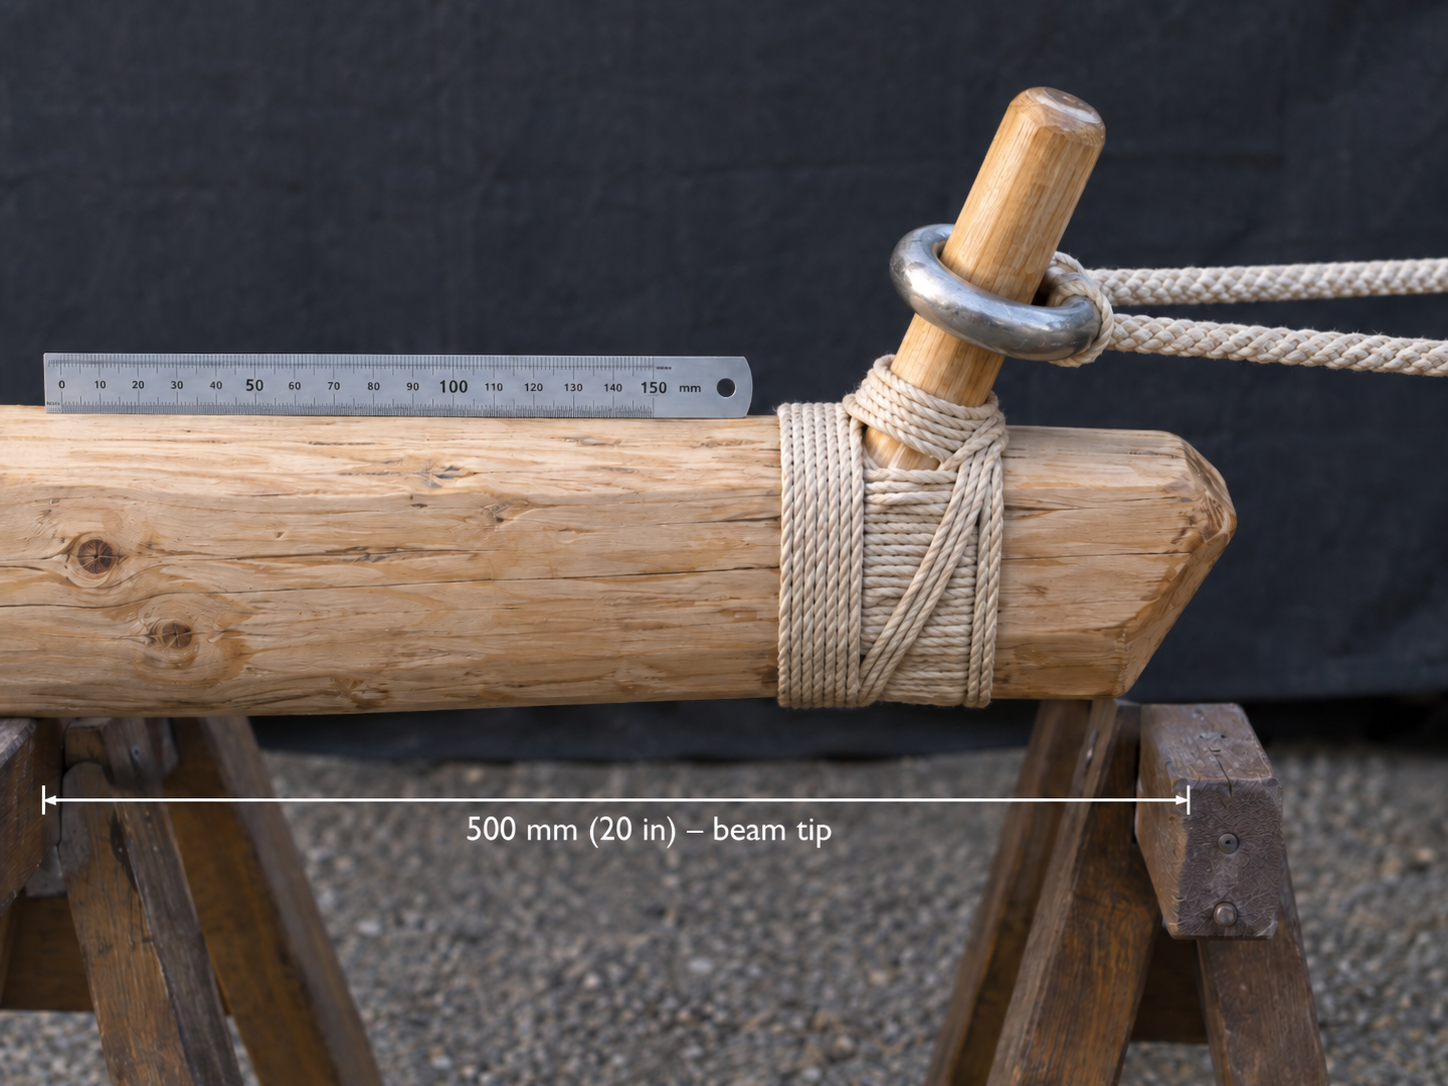
At the tip, lash a hardwood pin projecting 120 mm (5 in) and angled back along the beam. One sling line ends in a fixed loop, permanently attached at the tip. The other ends in an open ring that sits over the pin and slides off when the beam sweeps past. That pin angle is your launch angle, and it is the one thing you will spend all afternoon adjusting.
Start equal to the long arm — {{ slingLabel }} from tip to pouch centre. Both lines exactly the same length, or the pouch will tumble.
Cradle, not a bag. It should hold the shot at rest but spill it freely. Punch and whip the corner holes; knots inside the pouch abrade the shot.
Two parallel poles on the ground between the sills, so the pouch is dragged straight, not sideways. Skip this and your shots wander.
The counterweight
Build the box empty, hang it empty, and fill it on the machine, one bucket at a time. Nobody lifts {{ cwLabel }} of stone in one go, least of all alone. A hinged box swinging on two short straps outperforms a weight bolted rigidly to the beam — it drops nearer to straight down, which is where the energy is.
Rock runs about 1,600 kg per cubic metre once it is loose in a box (100 lb per cubic foot), so size your box to that volume plus a third. Wet sand is heavier and settles; earth is lighter and sheds water badly. Line the box with sacking so nothing works its way out between the boards and onto your foot.
Chock the beam down and tie it off before any stone goes in the box. Fill from the side, never from beneath. If the retaining line has to be cut to release, it is not a retaining line — it is a hazard.
Lashings & knots
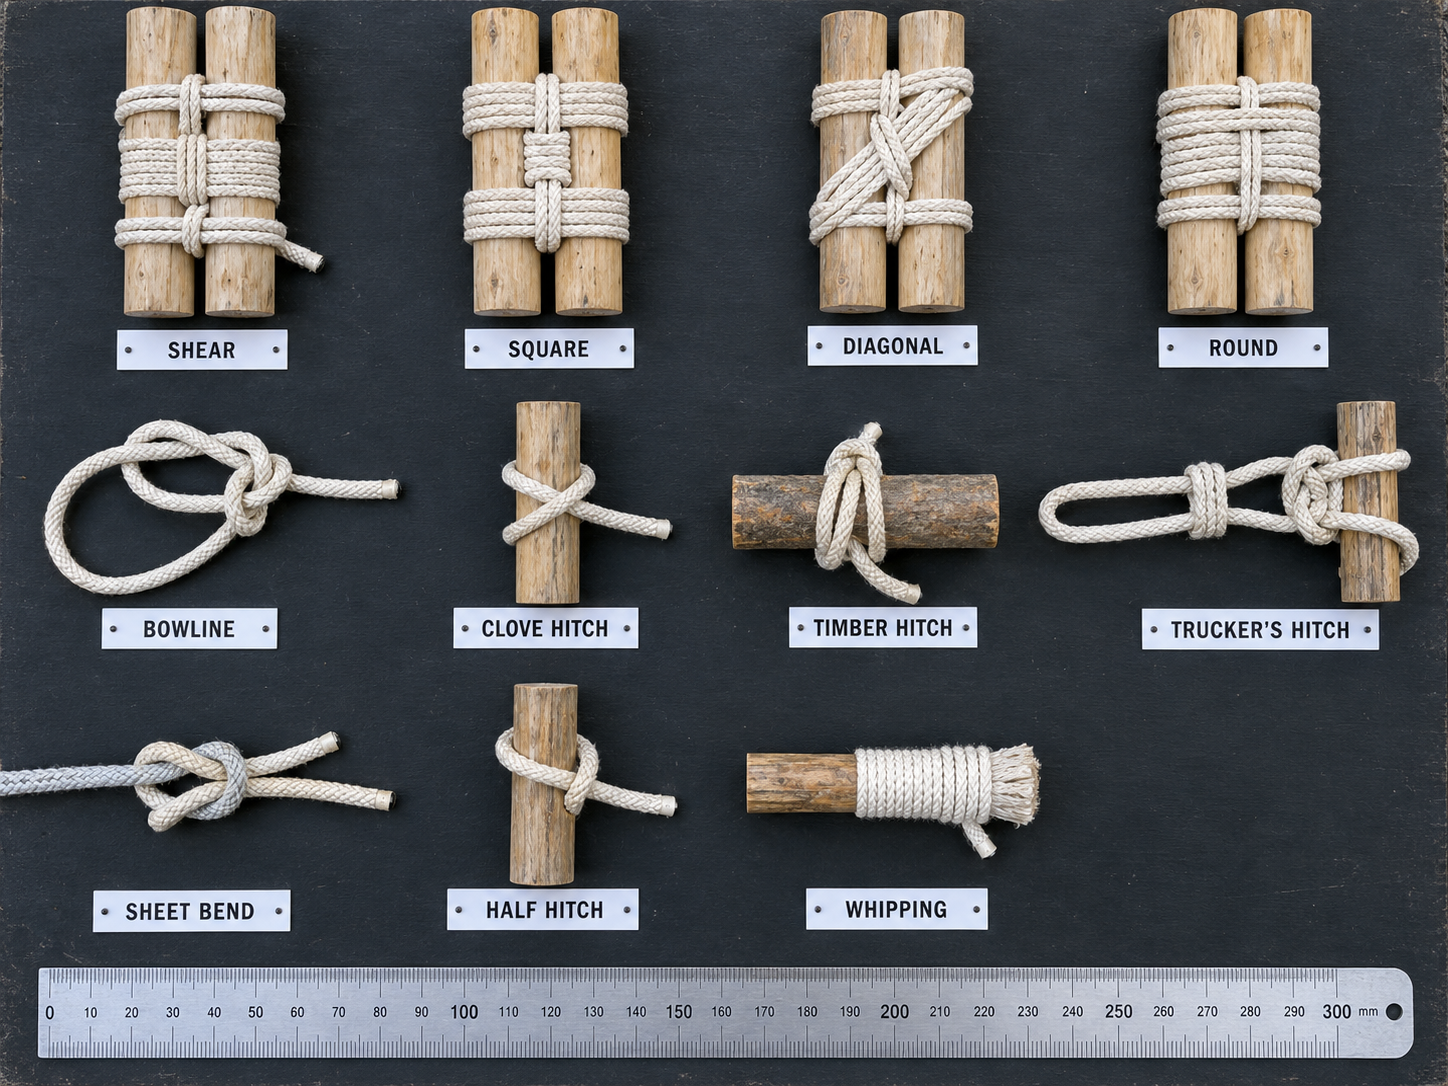
Seven knots and four lashings build the whole machine. Learn them at home, in the dark, before you carry an axe anywhere. A lashing holds by friction and tension, not by the knot — so the frapping turns at the end, the ones that squeeze the wraps together, are the part that actually does the work.
| Use it for | Knot / lashing | Watch for |
|---|---|---|
| A-frame leg crossings | Shear lashing, 8 wraps + 3 frapping | Wraps must be snug before frapping, or the legs scissor open under load. |
| Braces meeting legs at 90° | Square lashing, 4 wraps + 3 frapping | Start and finish with a clove hitch on the vertical member. |
| Diagonals pulling spring out of the frame | Diagonal lashing with a timber hitch start | The timber hitch draws the gap closed as you tension — that is the whole point. |
| Reinforcing the beam either side of the axle | Round lashing, 10 wraps, no frapping | Two lashings, 100 mm apart. Tap the turns tight with a wooden mallet. |
| Any fixed loop in a rope end | Bowline | Leave a hand's length of tail. It loosens when slack and cycled. |
| Taking the last 10% of tension out of a guy or haul line | Trucker's hitch | Your only mechanical advantage if you have no tackle. Finish with a half hitch. |
| Joining two ropes of different size | Sheet bend, doubled | Never in the sling. Splice or replace instead. |
Tuning & range table
Change one thing at a time and throw three shots before you believe anything. The table below is arithmetic, not prophecy: it assumes a {{ projLabel }} shot, a {{ cwLabel }} box dropping {{ dropLabel }}, and 30% of that energy actually reaching the projectile — a fair figure for timber and rope. Expect your first day to fall short of it.
| Launch angle | Range | Apex | Flight | Character |
|---|---|---|---|---|
| {{ row.angle }} | {{ row.range }} | {{ row.apex }} | {{ row.flight }} | {{ row.note }} |
Muzzle velocity {{ velLabel }}. Drag ignored — a dense, round shot will come close; anything light or irregular will not.
Releasing too early. Lay the pin flatter along the beam, 5° at a time.
Releasing too late. Stand the pin up towards vertical, or lengthen the sling.
Unequal sling lines, a twisted pouch, or no trough. Check the lines first; they are almost always the cause.
Stop. Weight the sills with stone, deepen the pads, and reduce the box by a fifth before throwing again.
Safety & failure modes
A loaded siege-scale trebuchet holds as much energy as a falling motorcycle. It does not care that you built it. Working alone, your only real protections are distance and sequence.
- Release from outside the frame's footprint, with a long lanyard — never from under the beam or beside the box.
- Nothing and nobody in the throw lane, ever, including to fetch a shot. Unload the box first.
- Announce every shot out loud even when you are alone. It makes you check.
- Inspect every lashing, the axle, and the sling before each throw. Thirty seconds.
- Stand down for wind, rain on your lashings, failing light, or your own fatigue.
| Failure | Warning sign | What to do |
|---|---|---|
| Beam snaps at the axle | Cracking on release; hairline splits from the bore | Retire the beam. Do not splint and keep throwing. |
| Lashings creep | Cord bright and fluffed; frames slowly splaying | Unload, re-lash with fresh cord. Tightening a stretched lashing does nothing. |
| Frame walks or hops | Feet sinking unevenly; sills lifting on release | Weight and stake the sills. Reduce the counterweight. |
| Sling hangs up on the pin | Shot fires backwards, or straight down | The most dangerous failure. Clear the area behind and above before you approach. Smooth and re-angle the pin. |
| Axle seizes or crushes | Squealing; charred or dished bearing wood | Grease with tallow, ream the bearing, fit a hardwood bushing. |
Field repairs
Things break at the end of the day, when you are tired and the light is going. Unload the counterweight first — every time, without debating it — and then decide whether you are fixing the machine tonight or in the morning.
Bind either side of the split with tight round lashings and drive a hardwood wedge across the grain to close it. Reduce the box by a third and finish the day gently.
Split a green hardwood billet, bore it, and lash it on as a sacrificial bushing. Replace the bushing, never the beam.
Replace both lines, not one — matched length matters more than strength. Keep the old pair as lashing cord.
Sew a doubled patch with whipping twine and a sailmaker's stitch, or fold and re-punch new holes 40 mm inboard of the tear.
Lever the sill up with a pry bar, pack the hollow with flat stone and rammed gravel — never loose soil — and re-level both sills before the next shot.
Manila swells and goes slack when it dries; re-tension every lashing the morning after rain. Polyester does not care. Tallow the axle again.
Empty the box, cut nothing you can untie, coil the cord by the fathom, and take the axle home. Lay the timber flat where it fell so the field can have it back. Fill your foot holes.
Glossary
- Apex
- Where two legs of an A-frame cross and the axle passes through.
- Beam
- The throwing arm. Short end to the counterweight, long end to the sling.
- Cocked
- Beam hauled down and tied off, counterweight raised, machine loaded and dangerous.
- Frapping
- The final turns of a lashing, run between the spars to squeeze the wraps tight.
- Gin pole
- A single guyed pole used as a temporary mast to raise something heavier than you.
- Guy
- A tensioned line from a high point to a ground stake, holding a structure upright.
- Pouch
- The cradle at the end of the sling that carries the shot and spills it on release.
- Release pin
- The hardwood peg at the beam tip whose angle sets the launch angle.
- Sill
- A ground timber spreading the frame's load and tying the feet together.
- Story pole
- A marked stick carrying every repeated dimension, so you measure once.
- Throw lane
- The marked corridor downrange that nobody enters while the machine is loaded.
- Trough
- Two ground poles that guide the pouch straight forward at the start of the throw.
Build slowly, throw once, then throw again. The machine teaches you more in three shots than this manual does in twelve sections.